|
 |
 |
 |
 |
 |
 |
 |
 |
 |
|
|
|
|
|
|
|
|
|
|


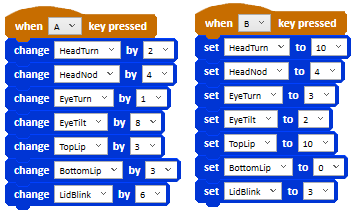
Ohbot has 7 Motors (6 for Ohbot1) that can move and you can control each of them separately. Each motor has a position which is set to a value between 0 and 10. You can either change or set the position of a motor using a block. You can use:

There's one of these blocks for each Ohbot's motors. Set the position of a motor to a number between 0 and 10 by typing into the box or by dragging a Sensing, Data or Operator block into this box (see below). You can change the motor that's being set by clicking on the motor name and selecting from the list of available motors.

This block allows you to change the position of a motor by a number between 0.1 and 10. You can also change by negative numbers between -0.1 and -10.

This block allows you to set the speed of a motor to a number between 0 and 10.
Here's some code to try out:
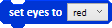
If your Ohbot has Illumineyes you can use this block to set the colour of the eyes. Click on "off" to show a list of the available colours.

If your Ohbot has Illumineyes you can use this block to set the red, green or blue of the colour of the eyes. Click on "red" to select whether you want to change red, green or blue. Type a number between 0 and 10 into the second box.

If your Ohbot has Illumineyes you can use this block to change the red, green or blue of the colour of the eyes. Click on "red" to select whether you want to change red, green or blue. Type a number between -10 and 10 into the second box to set the amount that you want to change the colour by.
Here's some code to try out:

A sequence in an Ohbot program must always start with an event block.

Use this block to start a sequence when the green flag button is clicked. You can see the green flag on the panel just under the menus. Clicking on the red button stops any programs that are running. Clicking on the yellow button resets Ohbot.
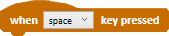
This block starts a sequence when you press a key on your keyboard. Click on "space" to show a list of the keys that you can use. You can use more than one of these blocks in one program so Ohbot does different things depending on which key is pressed.

If you have a microphone connected to your computer you can use this block to start a sequence when Ohbot hears you say a certain word. The words Ohbot can understand can be set from the Sensors screen on the Settings menu. Using a smaller vocabulary of words makes Ohbot's speech recognition more accurate.

Messages are used to pass information between different sequences of blocks within an Ohbot program or to start one sequence from another. If you have configured shared messages on a network you can also send messages between Ohbots.
Use the New Message button to create a new message, be sure to name it something that will help you remember what it is used for.
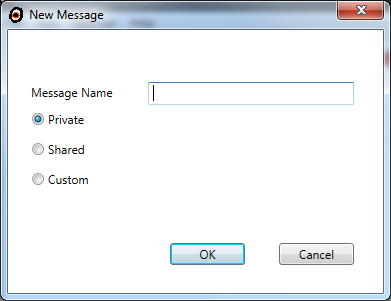
Select "Private" to use a message within an Ohbot program.
You can use a "Shared" message to send messages to another Ohbot on a network. Just set the shared message path in the Advanced menu to the same network path on both Ohbots.
You can use a "Custom" message to send a message to a network path where the network path can be different for each message. The shared path has to be typed in for each message on each Ohbot for a custom message.
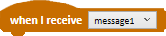
This event block will start when the message you choose is received. This is how you start one set of code from another set of code. Note that when i receive can be on a different program tab to the broadcast block that initiates it. If it's on several tabs then the one on the leftmost tab will be run.

Use this block to send out a message from within a sequence for a when I receive block to pick up. If you put a variable or sensor block in the box that holds the message name any message that contains the value of the block will be run. For example, if you put an answer block and this contains "tell me a joke" then any macro called joke will be run. If you put a value or a block in the box to the right of the message name this can be picked up by the sequence that receives the message in the message parameter sensing variable (see the Sensing section below).

Use this block to send out a message from within a program for a when i receive block to pick up and then wait until the program that's started by the when i receive block to finish before continuing. If you put a variable or sensor block in the box that holds the message name any message that contains the value of the block will be run. For example, if you put an answer block and this contains "tell me a joke" then any macro called joke will be run. If you put a value or a block in the box to the right of the message name this can be picked up by the sequence that receives the message in the message parameter sensing variable (see the Sensing section below).
Here's some code to try out:
These blocks are used to control Ohbot's speech.

Ohbot will speak the words you type into the text box on the block. The next block in the sequence will run straight away without waiting for the speech to finish. You can stress a word by surrounding it with {} or you can play a sound from a wav file by surrounding it with <>. For example
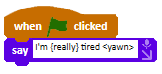
In this example the word "really" will be stressed and the wav file yawn.wav will be played if it exists in the documents\music\ohbot folder.
The pitch, rate and volume used for a simple {} emphasis are defined in the file Ohbot.exe.config in the folder within Program Files that you installed Ohbot to:
<setting name="SSMLEmphasis" serializeAs="String">
<value>pitch="x-high" rate="x-slow" volume="100"<value>
</setting>
You can also specifically set the pitch, rate and volume of an emphasis like this:
{pitch:rate:volume:text}
e.g. {x-high:fast:75:Hello}
There's more information about speech emphasis here but note that many of the options are not supported or are only supported by some voices.

Ohbot will speak the words you type into the text box on the block the same as the say block. The next block in the sequence will run once Ohbot has finished speaking. You can stress a word by surrounding it with {} or you can play a sound from a wav file by surrounding it with <>. See the say section above for more information about how a word is stressed.

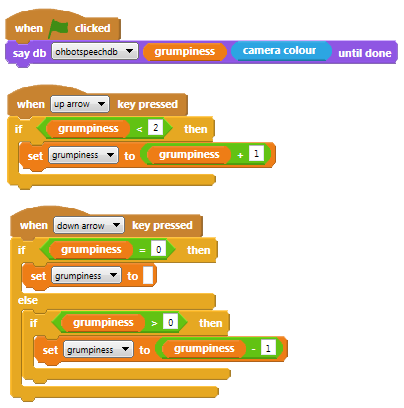
This block lets you speak text from a database. The database is defined in a comma separated values (CSV) file in the folder Libraries\Documents\Ohbot which can be edited in a spreadsheet program. You can select which phrase from the database should be spoken by putting text or blocks into the two empty boxes on the block. For more information about this refer to the documentation on the Ohbot website.
Here's some code to try out:

This block lets you set what voice Ohbot will use for speech. For the latest information about how to install extra voices for Ohbot go to the Ohbot Technical Zone here and look at the Voices document in the Installation and Translation section. This setting will be applied to all speech until another of these blocks is used to reset the voice or until the reset button is used or a new program is loaded.

This block lets you set the pitch, rate or volume of Ohbot's speech. The number needs to be between 0 (lowest for pitch, slowest for rate or quietest for volume) and 10 (highest for pitch, fastest for rate or loudest for volume). The default values for this are 5 for pitch and rate and 10 for volume. This setting will be applied to all speech until another of these blocks is used to reset the speech attribute or until the reset button is used or a new program is loaded.

This block stops Ohbot's speech even if it is in the middle of speaking.


Wait a number of seconds until moving onto the next block in the sequence. You can type the number of seconds in the text box.
There is an example of how to use a wait block in a program to make Ohbot blink in:
George's face tracking example program

Wait until a statement is true before moving onto the next block in the sequence.
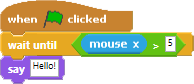
These blocks will make Ohbot wait until the mouse is moved past the middle of the screen in the X axis

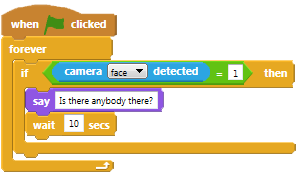
This block repeats whatever is inside of it as long as the sequence remains running. There is an example of how to use a forever loop in:
George's face tracking example program

Repeat the contents of the block a number of times.
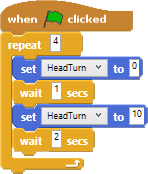
These blocks will make Ohbot look left, wait a second, look right, wait 2 seconds. This sequence will be repeated 4 times.
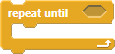
Repeat the contents of the block until a statment is true. Then move on.
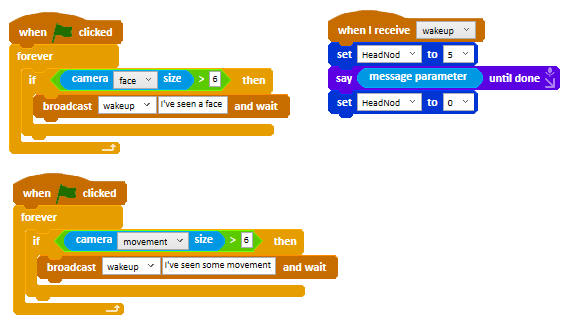
These blocks will make Ohbot repeat the words "Is there anybody there?" Until the camera sees a face.

If a statment is true run the blocks inside the block once.
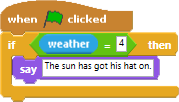
This sequence will make Ohbot say "The sun has got his hat on." if the weather input block is equal to 4 (which is the id for sunny) If the weather input block is not equal to 4 it will do nothing.

If a statment is true run the blocks inside the block once, if it is false run a different (else) set of blocks.
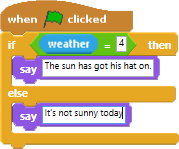
This sequence will make Ohbot say "The sun has got his hat on." if the weather input block is equal to 4 (which is the id for sunny) If weather input block is does not equal 4 Ohbot will say "It's not sunny today".

Stop the program or sequence. You can choose from the dropdown list whether to stop all sequences in the program (all) or just the sequence that this block is in (this script).
Ohbot can play back any sounds stored in the documents\music\ohbot folder. You could try recording sounds like laughing or breathing and use these to help bring your Ohbot to life. There are special blocks you can use to play and stop sounds inside your program.

Ohbot will play whatever sound is chosen in the drop down menu. The next block will run straight away without waiting for the sound to finish.

Ohbot will play the sound you have chosen in the drop down menu on the block the same as the play sound block. The next block will run once the sound has finished playing.

Windows 10 Only. Ohbot will play the sound you have chosen in the drop down menu on the block the same as the play sound block. It will loop until the program is stopped or the stop all sounds block is used.

Windows 10 Only. This block sets the volume of the sound that's playing or about to be played.

This block stops any sounds that are playing in any sequence in the program.
The sensing blocks are used to get input from the outside world into your Ohbot program.
Some of the blocks have a check box next to them, checking this box will display the block's current value at the top of the program widow.
You can also hover the mouse over a sensor block to see it's current value in the box at the bottom of the screen although this doesn't work for some of the more advanced blocks that require parameters.

This sensor block gives the position of the motor you have chosen from the list as a number between 0 and 10.

If your Ohbot has Illumineyes this sensor block gives the red, green of blue value of Ohbot's current eye colour.

This sensor block gives the position of the mouse in the x axis as a number between 0 and 10.

This sensor block gives the position of the mouse in the y axis as a number between 0 and 10.
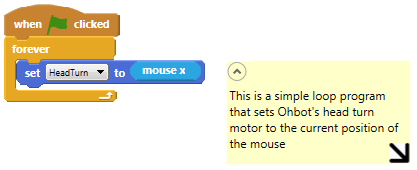
Here's some code to try out:
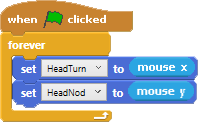
This program will let you control the position of Ohbot using your mouse. Moving the mouse left or right (mouse x) will turn Ohbot's head and moving the mouse up and down (mouse y) will make Ohbot nod its head.

This block gives a value of 1 if the key that's selected from the list is pressed or 0 if it isn't.

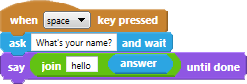
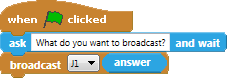
This block speaks what's in the text box and then waits for you to type a response. The response is available in the answer block (see below).

This block speaks what's in the text box and then waits for you speak a response. The response is available in the answer block (see below).
In Windows 10 you can choose to enable Cloud AI services by purchasing Ohbot Credits (select Purchase on the Cloud AI menu) or by creating your own Microsoft Cognitive Services (select Setup on the Cloud AI menu). If Cloud AI Speech is available this block will use it. You can select the language to recognize by selecting Cognitive Speech Locale on the Setup screen selected from the Cloud AI menu.

This block holds the answer that was typed or spoken in response to an ask and wait or ask and listen block.
Here's some code to try out:

This block is only available for Ohbot1. It gives a number between 0 and 10 based on the phoneme of the speech that Ohbot is speaking. This can be combined with a setMotor (MouthOpen motor) block to move Ohbot's mouth in time with it speaking.

This block is only available for Ohbot2. It gives a number between 0 and 5 based on the top lip movement for the phoneme of the speech that Ohbot is speaking. This can be combined with a setMotor (TopLip motor) block to move Ohbot's mouth in time with its speaking.
There's an example of this in: George's face tracking example program.

This block is only available for Ohbot2. It gives a number between 0 and 5 based on the bottom lip movement for the phoneme of the speech that Ohbot is speaking. This can be combined with a setMotor (BottomLip motor) block to move Ohbot's mouth in time with its speaking.
There's an example of this in: George's face tracking example program.
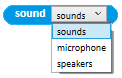
Windows 10 Only. This block gives a number between 0 and 10 based on the volume of any sound that's playing. From version 1.17.0 onwards you can choose from the list whether you want to monitor the sounds that are played as part of your program, sounds playing through the computer speakers or sounds coming into the computer microphone. This can be combined with a setMotor (BottomLip and/or TopLip motor) block to move Ohbot's mouth in time with sound. Note that on some computers it's not possible to monitor the sound through the speakers.

This block is used to track a face or movement that's "seen" by the camera. Select from the list whether you want to track faces or movement. This gives the position of the centre of the face or movement in the x axis as a number between 0 and 10.
A face is shown in the Camera Window as a dark blue square. Movement is shown with a light blue circle.

This block is used to track a face or movement that's "seen" by the camera. Select from the list whether you want to track faces or movement. This gives the position of the centre of the face or movement in the Y axis as a number between 0 and 10.
A face is shown in the Camera Window as a dark blue square. Movement is shown with a light blue circle.
For an example of how to use the Camera X and Camera Y blocks to make Ohbot track faces please see: George's face tracking example program

This sensor block gives a count of the number of faces or areas of movements detected by the camera. Select from the list whether you want to count faces or movement. Note that to detect more than one face you need to have face detect type set to Average in the sensor setting from the settings menu.
You can use Camera Detected in an operator such as greater than, less than or equal. Note that in previous versions of Ohbot software this block was called Faces Detected.

If a face or area of movement is detected this sensor block gives the size of the face or movement that the camera can "see" as a number between 0 and 10. You can use this to run a sequence when someone is close to the camera or moves a lot. Note that in previous versions of the Ohbot software this block was called Face Size.

If a face or area of movement is detected this sensor block gives the distance that the centre of this face or movement has moved since a face or movement was last detected as a number between 0 and 10. You can use this to run a sequence that reacts to fast movements of a face or movement. Note that in previous versions of the Ohbot software this block was called Movement.

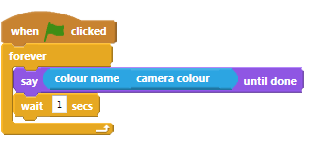
This sensor returns the colour the camera can see in the centre of the Camera Window converted into a number between 0 and 10. The colour is the hue of the colour which ranges from red through yellow, green and blue and back to red again. You can use the Colour Name block to get a description of the colour. A box showing the area that's being sampled is displayed in the Camera Window when you use this block.

Windows 10 Only. This block uses Microsoft Cognitive Face Services to analyse the most recent image where a face was detected. The image is uploaded to Microsoft's website about once every ten seconds (you can change this by selecting Setup from the Cloud AI Menu) so you need an internet connection and there is a slight delay in retrieving information. If there's more than one person in the image it will choose one at random.
To use this feature you can purchase Ohbot Credits by selecting Purchase from the Cloud AI menu.
Alternatively you can create an Azure Face API account on the microsoft cognitive services portal then enter the ID for your account by selecting Setup from the Cloud AI Menu.
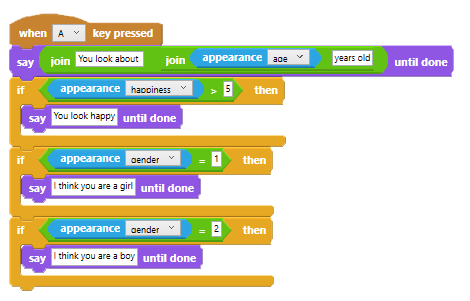
Once you are setup you can restart the Ohbot App and the Appearance block will appear in the Sensor blocks. You can select the type of face analysis that you want to use from the dropdown list:
Please note that you need to agree to Microsoft's terms and conditions when you create your ID.

Windows 10 Only. This block uses Microsoft Cognitive Computer Vision Services to analyse the content of the most recent image seen through the camera. The image is uploaded to Microsoft's website about once every twenty seconds (you can set this in Advanced Settings) so you need an internet connection and there is a delay in retrieving information.
To use this feature you need to create a trial Computer Vision account on the microsoft cognitive services portal.
Once you have obtained an ID for your account enter this in the Advanced Window on the Settings Menu then shut down and restart the Ohbot software. The Whatisit block will appear and you can use it to retrieve a textual description for what appears in the camera image.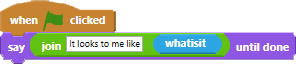
Please note that you need to agree to Microsoft's terms and conditions when you create your ID.

This block gives the X position within the camera frame of the highest saturation of the colour that's typed in the box. You can use this to get Ohbot to track the position of a ball or any brightly colour object. The point of highest saturation will be displayed in the Camera Window when you use this block in a sequence. The colour to put in the box is a bit hit and miss and depends on the camera but here's a rough guide:
You can also turn on display of Camera Colour by clicking the box next to it and then see what numbers it shows when you hold different colours in front of the camera.

This block gives the Y position within the camera frame of the highest saturation of the colour that's typed in the box. See the description for Saturation X (above) for more information.

This block converts the number that's typed into the box into a name for a colour:

If your have sensor inputs connected to your interface board this block can be used to read from them. The inputs blocks that are shown are preset to work with the Ohbot sensor pack but you can change them yourself by using the Inputs screen from the Settings Menus. This type of input block is used for sensors that produce a variable value between 0 and 10.

If your have sensor inputs connected to your interface board this block can be used to read from them. The inputs blocks that are shown are preset to work with the Ohbot sensor pack but you can change them yourself by using the Inputs screen from the Settings Menus. This type of input block is used for sensors that produce an on/off (boolean) value.

Windows 10 Only. If your have a micro:bit connected to your PC this block can be used to read from it. Follow the instructions here to program your micro:bit and install a driver then plug the micro:bit into a USB port. You can drop down the list to decide which sensor on the micro:bit to use in your program. Go to micro:bit on the settings menu to rename your sensors or adjust their range.

If your have i2c sensor inputs connected to your interface board this block can be used to read from them. This block will only appear if you have a file called i2cdefinitions.oid in Libraries\Documents\Ohbot. There's more information about this in the Sensor Pack add-on.

This block resets the timer in the sequence back to 0.

Each sequence has its own timer. This block gives the time in seconds since the sequence was first started. If you tick the box next to timer it displays the overall time since the first time a program was run.

This block give information about the current date, time, day of week and so on from the computer clock. You can select the type of information that you want the block to report from the list.

This block gives a number based on the weather from yahoo:
WeatherUnusual = 0
WeatherSnow = 1
WeatherRain = 2
WeatherCloud = 3
WeatherSun = 4
These could be combined with an If block to have Ohbot say different things depending on what the weather is like.
You can set the location for the weather on the Sensor page on the Settings menu

This block gives the current temperature sourced from Yahoo Weather. You can select whether this is degrees Celcius or degrees Farenheit by selecting Advanced from the Settings menu.

This allows you to call an external webservice with a parameter from inside the program and do something with the information that the webservice returns. For example you could use this block
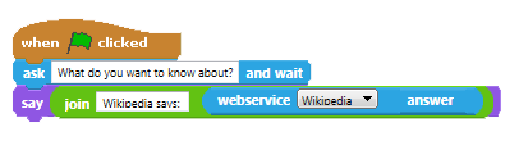
to speak the results of a Wikipedia search. The webservices that this block can call are defined in the file webcalldefinitions.owd in Libraries\Documents\Ohbot and there's information about the contents of this file on the Ohbot website.

If you use a when I receive block to start some code when a message is broadcast this allows a parameter to be passed by the message that was broadcast. For example you could pass the answer to a question to a message block (see example below)

If you use a when I receive block to start some code when a message is broadcast this allows you to identify the id of the Ohbot that sent the message. The id is set in the Ohbot Unique Name setting in the Advanced Window on the Settings Menu. It can be useful to know the ID of the originator of the message for Shared and Custom messages that are sent across a network.
Here's an example of what you could put in the broadcast message on the sending Ohbot to send a variable parameter from an ask and wait block to another Ohbot:
and here's what you could put in the when I receive block on the Ohbot that receives the message to say what the message was and the name of the Ohbot it came from:

Data blocks let us use and modify Variables and Lists. We can think of variables like a box we can put a number or some text in. Lists are like variables but they let you work with a group of items.
When you display a variable or a list by clicking the box next to it you can type directly into the display to change the list or variable. Each member of a list is separated by a | character.
The current values of lists and variables are saved with a program when you save it. The reset button clears all the current variable and list values.

This button is used to create a new variable. Make sure you name it something sensible that will help you remember what you are using it for.

This block lets you use a variable in your program, you can drag it on any box where you can type a number.

This block sets the value of the variable you choose to whatever is in the box. The box could hold another block or you could type in a number or some text.

This block changes the value of a numeric variable that you choose by whatever is in the box. The box could hold another block or you could type in a number.
Here's some code to try out:
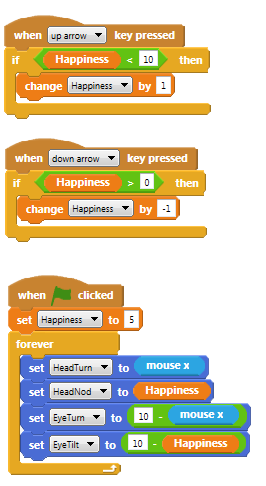
When you press the up or down arrow keys the happiness variable changes value. The tilt of the head is set by the value of the variable and the eye tilt is set to 10 - the value of the variable to keep the eyes straight.

This button is used to create a new list. Make sure you name it something sensible that will help you remember what you are using it for.

This block is mainly there so that you can see and edit the list members. You can use it in a sequence but it will return all of the entries so it's not very useful to do this.

This block adds the number or test in the box to the selected list.

This block removes an entry from the list. 1 is the first entry. You can type a position into the dropdown or use it dropdown to delete all entries in the list or the last entry.

This block inserts the number, text or block that's in the box into the list at a position. 1 is the position of the first entry in the list. You can type a position into the dropdown or use it to insert at the end of the list or at a random position.

This block replaces an item at a position in the list with the number, text or block that's in the box. 1 is the position of the first entry in the list. You can type a position into the dropdown or use it to replace at the end of the list or at a random position.

This block is used to retrieve an item from the list. 1 is the position of the first entry in the list. You can type a position into the dropdown or use it to retrieve from the end of the list or from a position at random.
This block is used to retrieve an item from the list. 1 is the position of the first entry in the list. You can type a position into the dropdown or use it to retrieve from the end of the list or from a position at random.

This block can be used in a testing block like If then to see if the list contains the entry that's in the box.
Here's some code to try out:
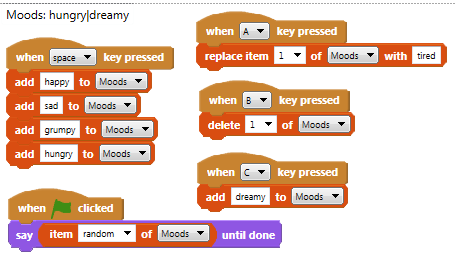
When you click on the green flag an entry from the list is spoken at random. The Space, A, B and C keys change the contents of the list. If you click the box next to the Moods list you will see the entries of the list displayed and you can type into there to change them..
Operator blocks let you work with numbers. Blocks with boxes can either have a block dragged onto them or a number typed in.

Add one block or number to another block or number.

Subtract one block or number from another block or number.

Multiply one block or number by another block or number.

Divide one block or number by another block or number.

This block gives a random number each time it is run. You can set the minimum and maximum number that could be generated

This block has two boxes that can contain a number or another block. The block is true if the value of the left hand box is Smaller than the value of the right hand box, otherwise it is false.

This block has two boxes that can contain a number or another block. The block is true if the value of the left hand box is Equal than the value of the right hand box, otherwise it is false.

This block has two boxes that can contain a number or another block. The block is true if the value of the left hand box is Bigger than the value of the right hand box, otherwise it is false.

This block has two boxes that can contain a number or another block. The block is true if the value of the left hand box is Smaller than or equal to the value of the right hand box, otherwise it is false.

This block has two boxes that can contain a number or another block. The block is true if the value of the left hand box is Bigger than or equal to the value of the right hand box, otherwise it is false.

This block has two spaces to hold other blocks. The block is true if Both of the blocks you drop on it are true.

This block has two spaces to hold other blocks. The block is true if either of the blocks you drop on it is true.

This block has a space to hold another block. The block is true if the block inside it is false or false if the block inside it is true.

This block is used to connect two words or sentences together. Remember to put spaces on the start or end of your words else they will combine into a single word

Windows 10 Only. This block is used to check if a word or phrase contains another word or phrase. The block is true if the second phrase appears anywhere in the first, otherwise it is false. It doesn't matter if words have capital letters

This block gives the remainder left over when the first box is divided by the second box. For example 10 mod 7 is 3.

This block gives the rounded value of a floating point number. For example, if a sensor gives a value of 1.77 this block will convert it to 2.
You can add a comment to any block by right clicking on the block and selecting add comment from the menu. You can also add a free comment that isn't attached to a block by right clicking on the Programming Window.
You can delete a comment by dragging it to the part of the screen that you select blocks from.
You can position the comment by clicking and dragging the top of it. A block comment will move when the block that it's attached to moves. A free comment can be attached to a block by dragging it and dropping it on the block.
You can size the comment by clicking and dragging on the arrow in the bottom right corner. You can "close up" a comment by clicking on the circle in the top left corner

Here are some tips and example sequences to help you get started with Ohbot.
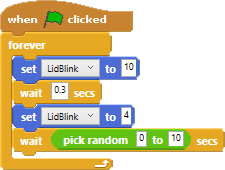
When the green flag is clicked, the Lid motor will be set to 10 (eyes closed) the sequence will then wait 0.3 seconds and set the lid position to 4 it will then wait a random number of between 0 and 10 seconds. This sequence is repeated continuously while the program is still running. It is a good idea to use random numbers for wait times as this makes Ohbot act more naturally. The amount of time between each human blink changes and is not always the same.
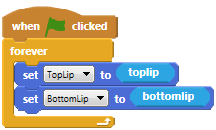
The toplip and bottomlip motion blocks allow you to move Ohbot's lips. You might have noticed that if you use these blocks on their own Ohbot's mouth does not move in time with speech. To get this to happen we use the toplip and bottomlip sensor blocks inside a loop to set the toplip and bottomlip motor blocks.
The toplip and bottomlip sensor blocks give a numbers between 0 and 5 that represent the phoneme of the word that Ohbot is saying. By updating the position of the lip motors to these numbers Ohbot will open its mouth in time with anything it is saying. In order to ensure this keeps updating we put this inside a forever loop meaning it will run continuously round once the green flag is clicked.
Note that if you are using v1 Ohbot the same thing is done by moving the mouth motor using the speech sensor variable
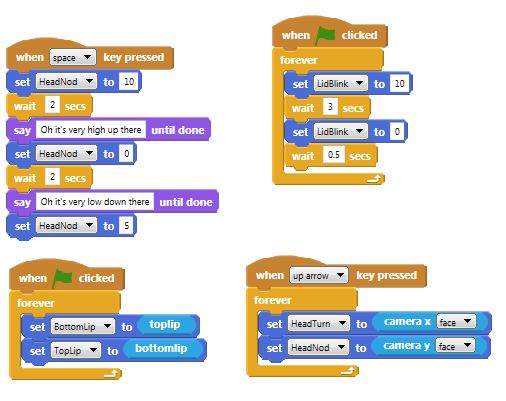
George has written a sequence which starts when the space key is pressed. This makes the head nod motor move in a sequence and speaks phrases.
George has written a second sequence which starts when the up arrow key is pressed. This uses the camerax and cameray sensor blocks to set the positions of the head turn and head nod motors - the program starts running and has the result of turning Ohbot towards where it sees a face on the camera screen. By putting the set motor block inside a loop the position of the motor is updated over and over again and so will follow any changes in the input.
George has written two other loops which start when the green flag button is pressed. One makes Ohbot blink by by combining set motor blocks and wait blocks. The other makes Ohbot's lips move in time to any speech.